Create and send a bulk message
Follow the steps below to send a bulk message using the Bulk Message Wizard.
Note: You can click Back at any point in the wizard to return to the previous step.
Prerequisites
If you want your bulk message to use some of Whispir’s key message features (such as 'No reply', ‘Message Alias’, 'Message Alert' and ‘Message Throttling’) you can only include them via a template. You can’t configure these features in the bulk message itself. Before you create your bulk message ensure that you either:
- Create a new template, configuring it with the required features
or - Know which existing template already includes the required features.
See Understand a message’s Features tab for more information.
Steps
There are four steps to sending a bulk message.
Important! Ensure that the maximum number of recipients in the .CSV file is 10,000 and the file size is no greater than 10 MB.
- Ensure that the required workspace is on the Workspace toolbar.
- Hover over the workspace to view the Workspace menu.
- Under Messages click New Bulk Message. (If you can’t see it, click More to view more commands.)
The Bulk Message Wizard opens at Step 1. - If you want to download the example template ‘whispir-example-bulk-message.csv’ click Example Template.
Add your message recipients to it and save it as a .CSV file with a new name. - Click Choose File and then in the Open dialog browse for and select the file (either the one you created from the template or one you created from scratch).
The file name is displayed when uploaded. - Click Next.
See About bulk messaging for information on preparing the data in the .CSV file.
- Select the check box beside each message channel to use for the message.
- In the field beside each selected check box select the column in the .CSV file to use as the data source.
- Click Next.
Note: Whispir automatically identifies the messaging channels if you’ve used Mobile and Email as column headers in the .CSV file.

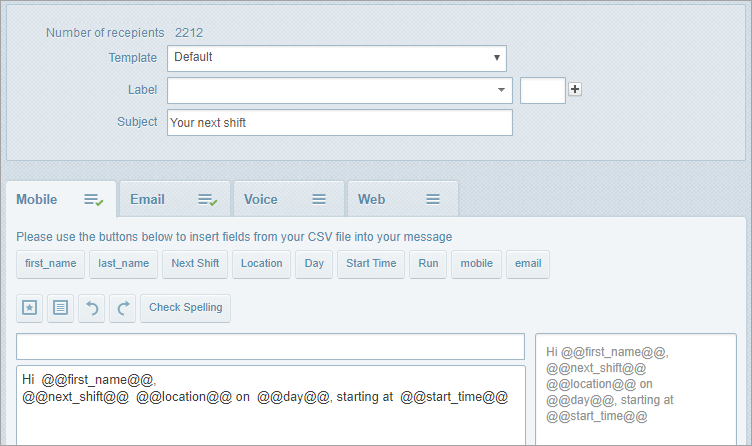
Note: The number of message recipients is shown at the top of Step 3.
- If you’re using a template, select it in the Template field.
The template will populate the channels with content. See Prerequisites. - (mandatory) Enter a subject for your message.
- Enter your message content (or edit any content added from the template) on the Mobile, Email, Voice and Web tabs, as appropriate.
Notes:
- By default, on the Email tab the rich text formatting toolbar is active. If you prefer to use plain text click Plain Text on the toolbar.
- For more information on how to enter and format your content on each tab see Step 8 in Create a new ‘classic’ message. But be aware that some instructions may not apply to bulk messaging.
- If required, insert fields from the .CSV into your message as @@ tags (at-at tags). The available fields (which correspond to the column names in your .CSV file’s header row) are all listed.
Place your cursor where you want to insert an @@ tag and then click the field name. - If you’ve added content on the Web tab make sure you type the @@web_link@@ tag in your content on the Mobile and Email tabs. This will insert a URL link to the web content when the message is sent. See About @@ tags (at-at tags) for more information.
- If you want to save your updated content as a new template:
- Click Save Template.
- In the Save Template dialog enter a name for the template and click Save.
The template is saved for the current workspace. - Click Next.

Some notes about message templates
- You can apply any template that is shared with the current workspace. This includes templates created for the workspace in the Rich Message Studio. See About the Rich Message Studio.
- Some message features, such as 'No reply', ‘Message Alias’ and 'Message Alert', will be applied if they were configured in the template you use. See Understand a message’s Features tab. If you want to use any of these messaging features select a template that has those settings configured in it or create one before you create your bulk message.
- It’s possible to create bulk-messaging-specific templates that use @@ tags that match the column headings in your .CSV file.
Note: For details about which features can or can’t be used with bulk messages see Message features and their compatibility with bulk messages.
- In the Preview Message field select a recipient (any one of the first 10 recipients in the .CSV file) to preview the message as it will be sent to that recipient.
- Click each message channel tab to preview the message for that channel.
- View the messages for a number of different recipients to confirm that the message content is formatted as you expect.
- Choose a send option:
- Click Send to send the message now.
- Click Send later to open the Schedule Message page and set a date and time for sending the message.
See About scheduling messages for more information.
Note: Any standard Whispir @@ tags you’ve included in your message content (that is, any tags other than those listed as fields for selection in Step 3) are not populated in the preview. They’re only populated when the message is sent.