Create, edit and use a custom list
This topic relates to Whispir’s ‘classic’ messaging features (not to the Rich Message Studio).
A custom list is a predefined list of options that can be inserted into a message or template. A list might be made up of capital city names, days of the week, incident types, business phone numbers and so on. Custom lists make it easy to add information quickly and consistently to your message content.
You can create, edit and use custom lists at any time when you’re creating ‘classic’ messages or templates.
Note: This topic also applies to templates created using Whispir’s ‘classic’ template functionality. See Create a new ‘classic’ template.

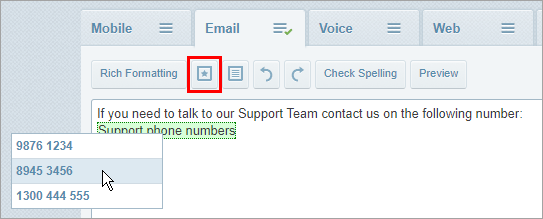
For example, you could create a custom list called ‘Support phone numbers’ and add all your company’s Support Team numbers to it. When a user creates a message and wants to include a contact number they don’t have to remember it or look it up, they can simply insert the list and then select the number they need.
Important tips:
- Custom lists are created once and can then be used anywhere within your company. They’re not workspace-specific.
- Take care when editing customs lists as other users may be affected by your changes.
- If you edit a custom list that’s already being used in a template, you’ll need to open the template, delete the custom list entry and re-insert it.
- Messages that contain custom lists can’t be sent until you’ve selected at least one option in every list you’ve inserted on all message channels.
- When you insert custom lists in a template you don’t necessarily have to select options for them. Any user creating a message that uses the template is then free to select whichever option they need.
- If you need to delete a custom list from a template, make sure you delete the list completely: select all content from a space before to a space after the list name.
- If you’ve deleted a list but you can’t send the message or save the template, it’s likely you haven’t deleted the list completely. Try deleting the segment of text around where the list had been and retyping it.
You can create a new custom list on the New Message page or Template page.
Note: To edit an existing custom list, follow the same steps below but click Edit instead of Add at Step 3.
- Open the New Message page or the Template.
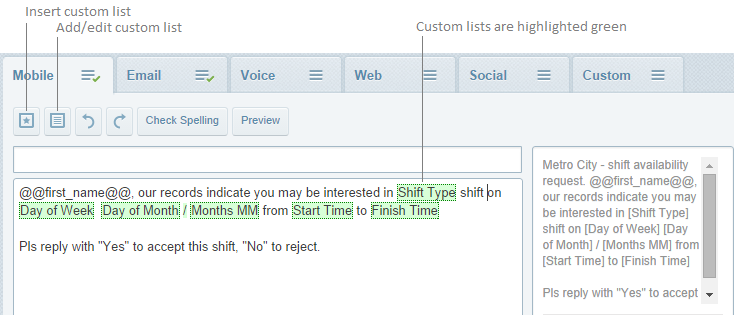
- On a channel tab (such as Mobile, Email, Web) click
 on the toolbar.
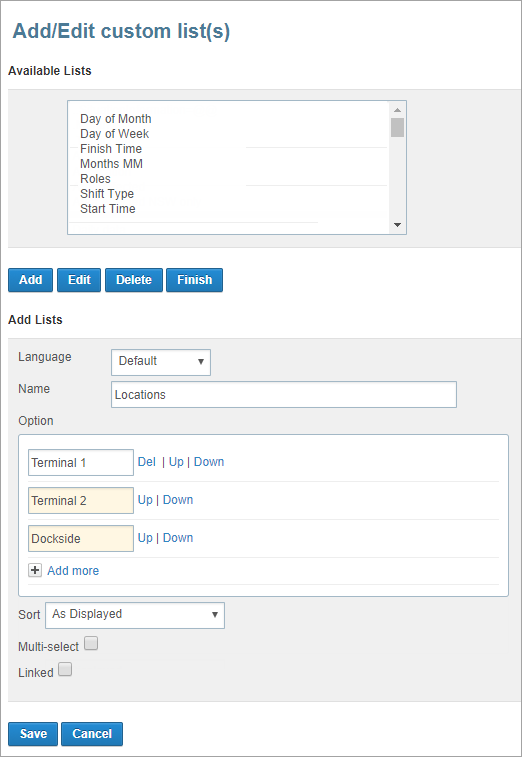
The Add/Edit custom list(s) dialog box opens. It lists the existing custom lists. - Click Add.
The Add Lists (or Edit Lists) section appears. - Enter a name for the list. For example, Locations.
- In the Option field enter the first option for the list.
- Click Add more to add another option and repeat to add all required list options.
- Reorder the list by clicking the Up and Down links.
- Click Del if you need to delete an option.
- In the Sort field select the sort order (or leave the default value ‘As displayed’).
- Select the Multi-select check box if you want users to be able to select multiple items on the list. Then enter a separator (how you want to separate items, such as with a comma or semi-colon or some other symbol).
For example, users can select Monday, Wednesday and Friday from the ‘Days of the Weeks’ list. - Select the Linked check box if you want to be able to update all identical lists in the message body with one selected option.
- Click Save and then click Finish.
Note: If you leave the check box clear users can only select one option.
For example, you insert the Locations custom list in your message content on the Mobile, Email and Voice tabs. When you select 'Terminal 1' in the first custom list it automatically appears in all 3 places.
If you leave the check box clear you could select different options for each custom list (for example, select Dockside, then Terminal 1, and then Dockside again).

Note: Ensure that you select a custom list option for each custom list you insert in a message. If you insert a list but don’t select an option you won’t be able to send the message.
- Open the New Message page or the Template page.
- Click the relevant channel tab (Mobile, Email and so on) and position the cursor where you want to insert the list.
- Click
 .
. - Select the required custom list and click Insert.
The custom list is inserted and is highlighted in green. - Click the green custom list and on the pop-up list click the option you need.
The option is added. - If multi-select has been enabled for this list you can click again to add another option.

- If the list has been set up as a linked list and you insert the list in several places in your content, select an option for one list only and all others will be populated automatically with the same option.
- Repeat Steps 3–7 until you've added all the necessary custom lists.