Generate a message report
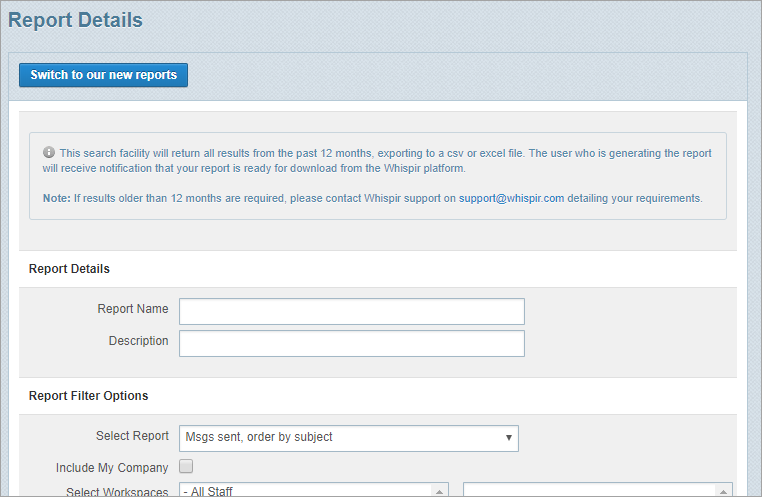
You use the Report Details page to either save or immediately export (in .CSV format) a message report. The report contains information about the messages you’ve sent, received and delivered, based on the report type, date range and workspaces you specify.
If your Whispir role is Company Administrator you have permission to report on messages from the full list of users and workspaces, not just your own messages or the workspaces you’ve been assigned to.
Important! Whispir strongly recommends that you generate message reports using its ‘classic’ reports view, rather than its ‘new’ reports view. Refer to Step 3 below.
Steps
- Hover over any workspace on the Workspace toolbar to view the Workspace menu.
- Under Reports click New Message Report. (If you can’t see it, click More to view more commands.)
The Report Details page opens. - Look at the label on the button at the top of the page:
- If it reads Change back to classic reports click the button to switch to the classic reports view, and then go to Step 4.
- If it reads Switch to our new reports you’re already in the classic reports view. Go to Step 4.
- Enter a name for your report and also add a description if you need to.

- In the Report Filter Options section:
- In the Select Report field select the report type you need.
- Select the workspaces to report on in the left pane and click Add To List to add them to the right pane. The list only includes workspaces you’ve been assigned to (unless you’re a company administrator).
(Press and hold the CTRL key to select multiple separate entries, or press and hold the SHIFT key to select a block of entries.) - (Company administrators only) Select the members (users) to report on in the left pane and click Add To List to add them to the right pane.
- Select the date range you want to report on.
You can either select a dynamic number of days (for example, the last 7 days, last 30 days and so on) or set a custom date range. - Do either of the following:
- Click Export to immediately generate the report (rather than saving your report setup).
The Report History section at the bottom of the page lists the report. - Wait for its status to change to Complete and then click Download in the Action column.
- Follow your browser’s prompts to open or save the file. (The process can vary from browser to browser.)
You have now completed the process. - Click Save to save your report setup (that is, the report type, workspaces and date range you specified).
The Report Details page opens and your report is listed in the section at the top of the page. Go to Step 7. - Export your report from the Report Details page:
- Locate your saved report in the list at the top of the page.
- In the Actions column click Export.
The Report History section at the bottom of the page lists the report. - Wait for its status to change to Complete.
- Click Download beside your report.
- Follow your browser’s prompts to open or save the file. (The process can vary from browser to browser.).
Note: If you only want to report on messages for the My Company workspace select the Include My Company check box.
The workspace selection pane is disabled.
OR
Note: Instead of exporting your report now you can schedule a time to export it. See Manage message reports.