About response rules
Response rules provide a way to group a message’s responses, making it easier for you to view and analyse those responses on the message’s Status page.
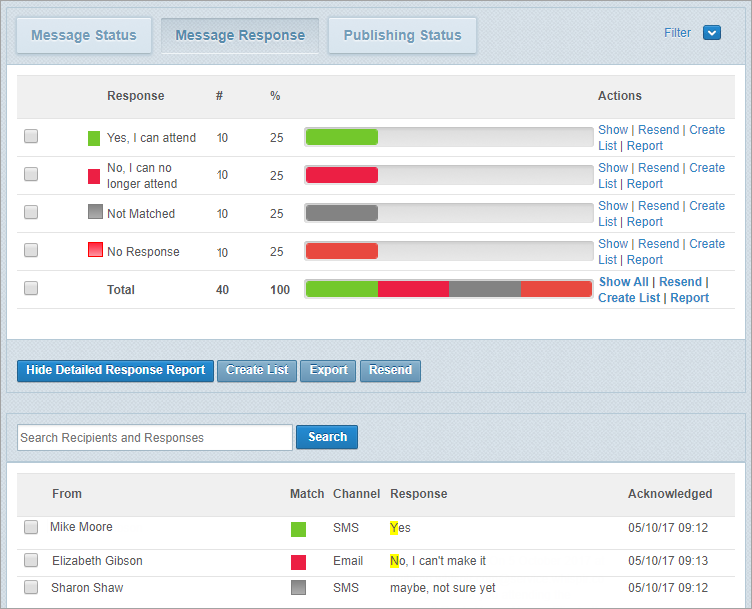
For example, you create a message to all staff reminding them about a training session being held at lunchtime on Wednesday. Your message asks staff to indicate either ‘Yes, I can attend’ or ‘No, I can no longer attend’. You create your message using a template that includes the relevant response rule and then send it. When the responses come in, the response rule is applied, sorting the responses into ‘yes’ or ‘no’ groups and assigning colour-coding to them to make them stand out.
Note: You create and apply response rules at the workspace level.
How to apply a response rule to a message
If you’re creating your message using:
- Whispir’s ‘classic’ message feature: You apply a response rule by using a template that already has the appropriate response rule selected in it. See Create a new ‘classic’ template.
- Rich Message Studio: You select the appropriate response rule at the Features step (on the Reports tab). See Understand a message’s Features settings.
How to view message responses
You view message responses on a message’s Status page.
- Open the View My Messages page for the relevant workspace. (On the Workspace menu click Messages.)
- Locate the sent message and click Status beside it.
The message’s Status page opens at the Message Status view. - Click Message Response to view response details, and then click View Detailed Response Report to see more information.
- If a response rule has been applied the responses are grouped and colour-coded according to the rule.
- Any responses where there is no match are grouped as ‘Not Matched’.
- In the Detailed Response Report section, exact matches on a rule are highlighted in yellow.
