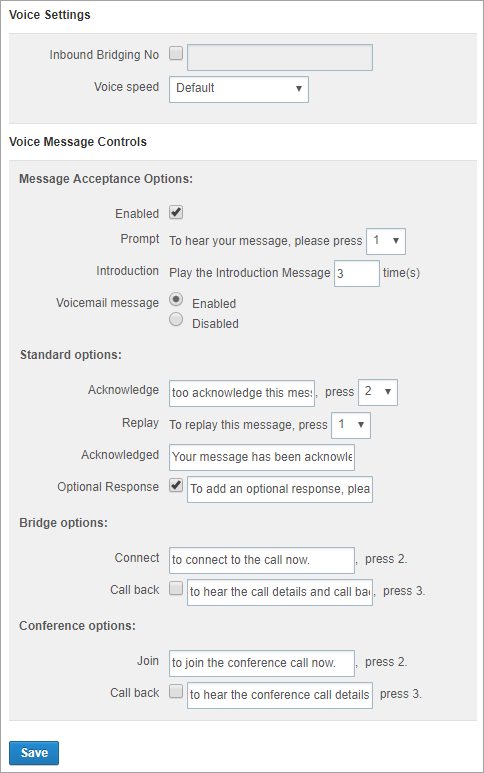
Configure voice settings
Role: Company Administrator.
You can configure a number of settings that control voice message behaviour, including prompts that instruct call recipients to press particular keys on their phone key pad.
Steps
- Open the Company Settings page (click
 > Administration sidebar > Company Settings).
 - In the Settings pane on the left expand Messaging and click Voice.
- Configure the settings outlined below as required and then click Save.
Voice Settings section
- Inbound Bridging No: (Not applicable. This feature is no longer in use)
- Voice speed: Select the speed at which the synthetic voice speaks the message content and prompts. For example, select Slow or Fast.
Note: Depending on how voicemail has been configured by Whispir for your company, the voice speed setting you select might not be applied. If this is a feature you need to use, contact the Whispir Support Team (support@whispir.com) to confirm if it’s available for your account or not.
Voice Message Controls section
All settings below apply to outbound voice messages only.
- Enabled:
- Select the check box to activate the initial prompt message (that is, ‘To hear your message, please press ...’).
This prompt is played when a call recipient answers a call. If a user has added a short introduction to the voice message, it’s played immediately before the prompt. - Leave the check box clear to disable all message acceptance options. The introduction message (if there is one) and then the main message (the body) are played immediately, without the user being prompted to press a key.
- Select the check box to activate the initial prompt message (that is, ‘To hear your message, please press ...’).
- Prompt: Select the number (or #, * or any key) that a call recipient has to press after the prompt in order to continue. (The default value is 1.)
- Introduction: Select a number to indicate how many times you want the introduction prompt (and the introduction message, if there is one) to be played. (The default value is 3.)
- Voicemail message: Select an option:
- Enabled: (this is the default setting) If a call is answered but the recipient has not pressed the specified prompt key, Whispir assumes that the recipient’s voicemail system has been activated. It will play a voicemail message that includes details of the message retrieval service the recipient must call to retrieve the details of the missed call.
- Disabled: Select this option to disable the voicemail message function. If the call is answered but the recipient doesn’t press the specified prompt key, the call is ended.
The following settings control what happens after the recipient has listened to the body of the voice message.
- Acknowledge: Review or edit the default wording that is played to a call recipient to prompt them to acknowledge that they’ve received the call. Then select the number (or # or *) that you want them to press. For example, ‘To acknowledge this message ... press ... 2’. (The default value is 2.)
- Replay: Select the number (or # or *) that a call recipient can press to replay the message. (The default value is 1.)
- Acknowledged: Review or edit the default wording that will be played to a call recipient after they’ve successfully acknowledged the message. For example, ‘Your response has been recorded’.
- Optional Response: Select the check box if you want call recipients to be able to provide more information by pressing a particular key. Then review or edit the default wording for the prompt. (The check box is selected by default.)
Note: When a recipient presses the key, Whispir updates the status of the message to Acknowledged. See View and understand a sent message’s status.
Note: The Optional Response feature relies on a user entering additional content in the body of the voice message that explains how the recipient can provide more information. For example, the body might include the wording ‘Please indicate if you’re able to attend by pressing 6. If you can’t attend press 7’. The value they press is recorded as part of the message response and can be viewed on the message’s Status page (in the Detailed Response Report under Message Response). See View and understand a sent message’s status.
Note: If a user creates a voice message using a template that has a response rule, the response rule wording is used instead of the ‘Acknowledge’ wording. And the Optional Response feature is not applied. See About response rules.
The following settings apply if a user enables the call bridging function when they’re creating a voice message and they enter only a phone number, not an account number and PIN as well. That is, they want to bridge to a standard phone call, not to a conference call.
- Connect: Review or edit the default wording that will be played to a call recipient. For example, ‘To connect to the call now ... press 2’.
- Call back: Select the check box if you want a call recipient to be able to press 3 to hear (and write down) the callback details and then call in later.
The following settings apply if a user enables the call bridging function when they’re creating a voice message and they enter conference call details (phone number, account number and PIN).
- Join: Review or edit the default wording that will be played to a call recipient. For example, ‘To join the conference call now ... press 2’.
- Call back: Select the check box if you want a call recipient to be able to press 3 to hear (and write down) the conference call details and then call in later.

Related links
- About Company Settings
- Create a new ‘classic’ message (see the ‘Voice tab’ section in Step 8. Compose the message content)
- Define call bridging options
- About response rules