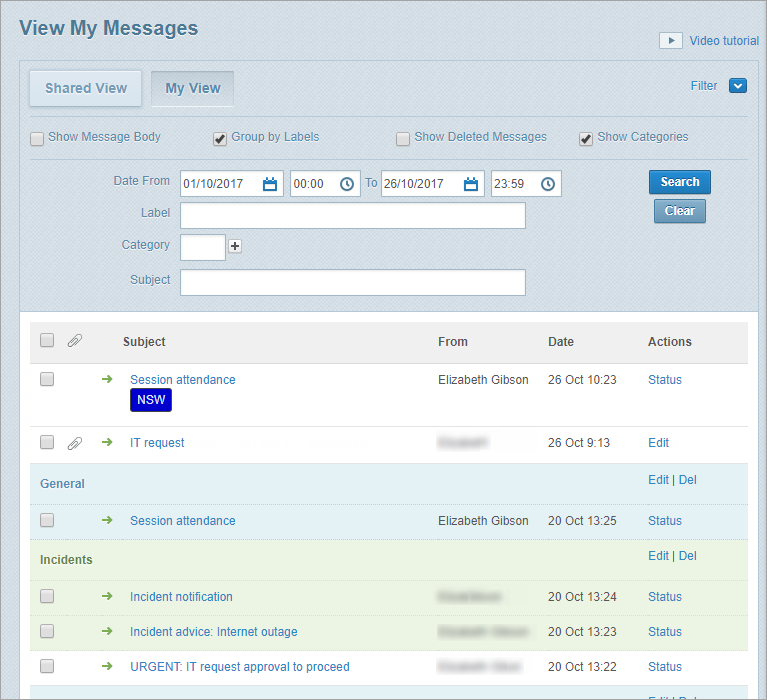
Apply filters on the View My Messages page
You can apply search filters and other options to control and group the messages you see on a workspace’s View My Messages page. This is useful when there are many messages in your workspace.
Note: If you change the view by applying any filters Whispir remembers those settings until you log out.
Steps
- Ensure that the required workspace is on the Workspace toolbar.
- Hover over the workspace to view the Workspace menu and then click Messages.
The View My Messages page opens. - Click
 .
.
All filter options appear. - Select any of the following check boxes:
- Show Message Body: Displays the first few sentences of the message content.
- Group by Labels: Groups messages that had a label applied to them when they were created. The label appears at the top of each group. The messages are shaded either blue or green to help you distinguish the groups easily.
- Show Deleted Messages: Display messages that you’ve deleted.
This check box is only available if you’re in My View, not Shared View. See Delete messages. - Show Categories: Display any categories that were applied to messages when they were created.
- Enter values in the filter fields as required and click Search:
- Date From and To: Enter a date range to find only messages sent within that period.
- Label: Click in the field and select a label to find messages that have the label applied to them.
- Category: Click in the field and select a category to find messages that have the category applied to them.
To select more categories click in the new field that has been added. - Subject: Enter text to find messages that have that text in their subject line.
The View My Messages page refreshes automatically.
The View My Messages page refreshes to show messages matching your combined filter values.
Tip! To remove filters and revert to the default message view click Clear.
